
Washcloth Puppets
Found this free pattern on sewing.org. Pretty cute, huh?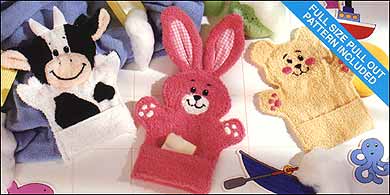 |
Cow
- Four Washcloths, two white, one black and one peach
- One 6" x 3" (15 cm) x 7.5 cm) piece of fabric, white
- Two Skeins Embroidery Floss, black and white
- Water Soluble Pen
- Paper Backed Fusing Web (opt.)
Bunny
- Four Washcloths, three pink, one white
- One 5" x 5" (12.5 cm) x 12.5 cm) Piece of Pink Gingham
- Two Skeins Embroidery Floss, black and white
- Water Soluble Pen
- Paper Backed Fusing Web (opt.)
Bear
- Two 12 1/2" x 13" (32 cm x 33 cm) washcloths, light brown
- Three Skeins Embroidery Floss, black, white and pink
- Water Soluble Pen
- Paper Backed Fusing Web (opt.)
Instructions
Faces and Appliqués
- Pin patterns to washcloths placing bottom edges of puppet pattern on finished edge of cloth. Do not cut yet. Transfer MARKINGS for faces.
- Embroider nose, eyes and paw pads using a SATIN STITCH. Embroider mouth using a CHAIN STITCH. Cut out body pieces.
- Cut out appliqués for bunny ears and muzzle, cow head patches, body spots and muzzle. Appliqué pieces to puppet bodies.
Bunny Ears
- Appliqué gingham inset to front of ear.
- Stitch ear front to back.
- Trim Seams. Clip curves and turn right side out.
- Form tuck at the center of the ear.
- Baste ears to head, having raw edges even
Cow Ears and Horns
- Stitch ear front to back.
- Trim seams.
- Clip Curves and turn right side out. Fold along fold line. Baste to head, having raw edges even.
- Fold horns in half with right sides together, stitch curved edge. Turn right side out. Press seam to center back. Stuff lightly. Baste to head having raw edges even.
Body
- Fold up lower edge of puppet front along fold line, forming pocket. Baste along side edges to hold in place.
- Stitch front to back at side seams. Clip curves. Trim seams to 1/8", turn right side out.
- Top stitch 1/8" inch all around leaving lower edge open.
4 comments:
Cute patterns. I especially like the bag (one can never have too many bags)so I'm going to try it today. I need an invite to your other blog so I can keep up with your Vet School experience and your cute family. wells@infowest.com
Thanks.
Mags, I don't know if you know I am the enrichment leader and so I now love your blog for all your cute ideas. I am going to have to use these. So, thanks. Sorry, that my phone died when we were talking. Then we went camping for the weekend and have been out of touch. I will call soon.
meine guete!! You ARE becoming the profi-frau!! We're so impressed! It's so good to be in contact with you all again...give your cute family hugs for us...and we'll have to stay in good contact now :) Thanks for your kind words of encouragement...they have really meant a lot to us!
Hello,
Your page has been gifted a RSS feed to your site to our Blog page, http://joyfulcreation.blogspot.com.
Thank you for your great gifts. We are proud to have you part of our network of artists.
Your devoted servants,
White Buffalo Calf Woman and
Lisping Wise One
Post a Comment